

Introduction: 3D Print Infill Jewelry


I've see people post simple 3D prints to have as an example of what infills look like. There are so many interesting infills, I thought it would be fun to use the infill designs to make jewelry. This project requires very little when it comes to actual 3D designing and mainly focuses on slicing the design for 3D printing.
Instructable 333
Supplies
- Tinkercad
- 3D Printer
- Filament - you can use fun colored filaments or just painting when you're done
- Jewelry Findings - I'm using jump rings and earrings
- Jewelry pliers
Any Amazon links are Amazon Associates links.
Step 1: Design


The designing is the easy part. I used Tinkercad and their basic shapes menu to gather a variety of designs to experiment with. For each design I decided to make them 3mm thick which was 15 layers when I sliced it. This is something you can mess around with now, but you can usually change this in your slicer too.
The other thing I did with each design was put a 2mm in diameter cylinder hole for a spot to hang the jump ring. With a lot of the infills you don't necessarily need a hole but this ensures things are centered and hang right.
You can make any design you want, but I've uploaded the ones I did for you to play around with.
Attachments


Step 2: Slice - Prusa


Time to slice the important part. I use the PrusaSlicer because I need to with my printer so I'm going to cover that first but I'll also cover Cura in the next step which is free for anyone to use. Though, really, these directions can transfer over to any slicer.
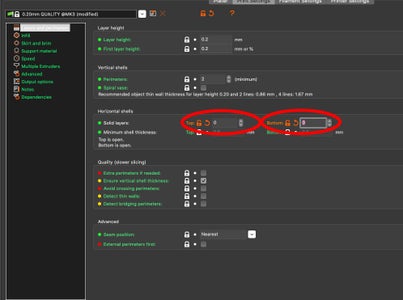
First of all, the most important thing you need to do is remove any Top and Bottom Solid Layers. So, reduce those down to 0. This is what will allow the infill to show.
Now that you have the layers sorted you can mess around with the infill. Different things are going to change how this looks depending on the design.
Now you can mess with the Fill Pattern. There should be a variety to play with (and I'll cover them a bit more later). Select and slice different designs to see how they look.
Lastly, play around with the Fill Density. Most likely you will use a lower number. I stuck with 15% with most of my designs. The higher this number, the harder it will be to see the pattern.
Step 3: Slice Cura


Cura is going to provide much of the same options.
Again, change your Top Layers and Bottom Layers to 0.
Next mess around with the Infill Pattern and Infill Density.
Step 4: Slice Designs Together or Seperate


Something I didn't even realize I would have to think about is how many designs are in your file you bring into the slicer. This may sound weird, but if you bring multiple designs in one file it will find the center to start the infill design from there. Some patterns this won't matter, but others it will.
In the first image, I brought each of those three designs as a different file so the infill pattern used the center of each design as the center point of the infill.
In the second image, all three were brought together and the very center of all of them is the center of the infill pattern. This can cause them to look weird and not match.
The last image shows Cura, where the three designs on the right were brought in together and the designs on the left were separate. You can see the ones on the left match because they had the infill done to each whereas the ones on the right don't because it used the center of all to center the pattern.
Step 5: Infill Percentage

Here is just a little look at how both the Infill Density and height of the print.
In the examples above the top row is thinner, and the bottom row is thicker.
On the left there is 15% infill, then 30% infill, and last 60% infill on the right.
Step 6: Type 1 - Straight Up and Down

While testing out and slicing with the different Infill Patterns I noticed there were 3 different types. The first I'm calling straight up and down meaning the pattern each layer is the same going from the bottom of the print to the top.
This is pretty normal and many of the patterns looked this way.
Step 7: Type 2 - Gradual Change

The second pattern gradually changes each layer. As you can see in the two styles shown, for each layer going up the infil moves slightly. This gives the pattern more depth.
Step 8: Type 3 - Every Other Layer Different


With the third and last pattern type every other layer is the same. So it's not too noticable, it looks like the first type but is slightly different in that there are two different layer patterns that alternate.
The second image shows the slicer and you can see Layer 1 and then what it looks like with Layer 1 and 2. So for the first layer it did the lines one way, and the second layer it did them the other way.
Step 9: Stability


Another thing to take into consideration when choosing the Fill Pattern is the stability of the print. There are a few designs that either can't be printed at all (third image) or are not very stable when printed.
With these you can see that they are easily pushed/distorted. Though, I did notice if I added a hole to the center of the design (bottom row second picture) it added more stability.
Step 10: Make Into Jewelry


Now to make into jewelry!
Print off your pieces in the color you want and add a jump ring plus an ear wire and you're done!
This could also be good as pendants or possibly keychains.

Participated in the
Jewelry Challenge


